Почему не работает сайт БК Pin-Up.ru
Почему сайт БК Pin-Up.ru не открывается или долго загружается: рассказываем о самых популярных ошибках, которые возникают при попытке зайти на сайт букмекерской компании.
Эта статья про букмекерскую
контору Pin-Up.ru
Все о букмекере
Чаще всего проблема со входом на сайт или в мобильное приложение БК Pin-Up.ru находится на стороне пользователя: нестабильное интернет-соединение, неполадки с роутером/кабелем, неправильно настроенный антивирус или DNS-сервера, ошибка при вводе адреса в браузерной строке
Но бывают и другие причины:
- проблемы со стороны хостера – отключился интернет, технические работы, неполадки на линии, неполадки с железом;
- проблемы со стороны букмекерской конторы Pin-Up.ru – технические работы на сайте, DDOS атаки, переезд сайта.
Почти все проблемы со входом решаются на стороне клиента, а если ничего предложенные решения не помогли — лучше обратиться в техподдержку.
Некоторые нелицензированные букмекеры и игорные компании используют словосочетание «Pin-Up» в своих названиях, чтобы привлечь игроков за счет чужого бренда. Таких компаний много и ошибиться легко, поэтому первым делом проверяйте, правильно ли написан адрес сайта: pin-up.ru.
Интернет-соединение
Одна из популярных причин, по которой сайт букмекерской конторы не открывается – проблемы с интернетом.
- Попробуйте открыть социальную сеть или любую другую страницу, чтобы убедиться, что интернет не отключен.
- Измерьте скорость интернета. Возможно, на линии неполадки и скорости не хватает, чтобы открыть страницу.
- Перезагрузите свой роутер или переподключите интернет-кабель к компьютеру.
- Позвоните своему провайдеру и убедитесь, что не ведутся какие-нибудь техработы, из-за которых вы не можете попасть на сайт.
Еще можно попробовать открыть сайт, раздав интернет на свой ПК со смартфона. Если страница открылась – то проблема именно в вашем провайдере. Некоторые провайдеры уменьшают скорость, если баланса не хватает, чтобы оплатить интернет за следующий месяц.
Антивирус
Программа, которая должна защищать ваш компьютер от вредоносных вирусов, может блокировать доступ к определенным сайтам. Например, пользователи «Антивируса Касперского» часто жалуются на то, что не могут зайти на сайты букмекерской конторы пока не отключат антивирус.
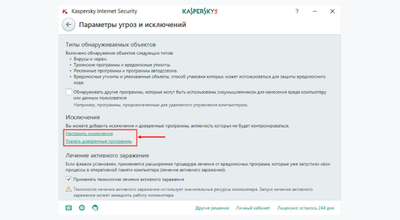
Если отключать защиту не хочется, то можно добавить сайт в список разрешенных. Для этого:
- откройте антивирус на своем ПК;
- перейдите в настройки, затем нажмите «Защита» → «Веб-Антивирус»;
- в открывшемся окне «Параметры Веб-антивируса» выберите «Расширенная настройка»;
- нажмите «Настроить доверенные веб-адреса» и укажите ссылку на букмекерскую контору Pin Up.
Закройте окно с антивирусом и попробуйте открыть сайт еще раз.
Если вы пользуетесь другим антивирусом, то инструкцию по тому, как добавить сайт в исключения, можно найти на официальном сайте разработчика
DNS-сервера
Еще одна популярная проблема, которая возникает у пользователей букмекерской конторы Pin-Up.ru – неправильно настроенные DNS-сервера. По-умолчанию у всех пользователей стоят динамические DNS-адреса, которые меняются. Чтобы зайти на сайт букмекерской конторы, может понадобиться установить статические адреса.
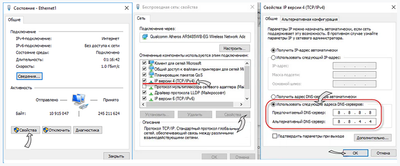
Если у вас компьютер под управлением Windows:
- нажмите Win+R и введите ncpa.cpl в строке;
- перейдите во вкладку «Сетевые подключения»;
- нажмите на кнопку «Свойства»;
- выберите раздел «Компоненты»;
- затем перейдите во вкладку «Протокол интернета TCP/IPv4»;
- найдите пункт «Использовать следующие адреса DNS-серверов» и поставьте галочку напротив этого пункта;
- в поле «Предпочитаемый DNS-сервер» введите 8.8.8.8;
- в поле «Альтернативный DNS-сервер» введите 8.8.4.4.
Теперь нажмите кнопку «Ок» и перезагрузите свой компьютер, чтобы изменения вступили в силу.
Для Windows 7,8 и 10 – шаги по установке статического DNS-адреса – одинаковые
Если вы пользуетесь macOS:
- перейдите в меню вашей системы и выберите «Системные настройки»;
- перейдите во вкладку «Сеть»;
- нажмите «Дополнение»;
- найдите строку DNS-сервер и введите там 8.8.8.8.
Перезагрузите компьютер, чтобы настройки вступили в силу.
Если у вас уже стоял статический DNS и появились проблемы с доступом к букмекерской конторе Pin-Up.ru, то установите автоматический выбор DNS серверов, убрав галочку с пункта «Использовать следующие адреса DNS-серверов» и перезагрузите компьютер.
Другие причины со стороны пользователя
Есть еще несколько возможных причин, из-за которых не получается зайти на сайт Pin-Up.ru:
- Вы используете прокси или VPN и доступ к этому сайту заблокирован – попробуйте отключить программу и зайти со своего IP-адреса. Вообще, не рекомендуется скрывать реальный адрес, так как можно получить блокировку за подозрительную активность.
- Вы ошиблись в адресе сайта или домене.
- Вы были заблокированы в букмекерской конторе за нарушение правил – это может быть ошибочная блокировка. Если вы уверены, что не можете попасть в бан из-за того, что ваш IP в черном списке – свяжитесь с администрацией Pin-Up.ru, чтобы выяснить детали.
- Ваша версия браузера устарела – если вы пользуетесь слишком старой версией браузера, или, например, IE, то сайт может не открыться.
- У вас слишком много временных файлов в кэше – почистите браузер и попробуйте открыть страницу еще раз.
Если на вашей стороне все хорошо, то проблема со стороны хостера или самой букмекерской конторы.
На сайте технические работы
Любой сайт требует обслуживания или улучшений, поэтому он может работать медленнее, чем обычно или не работать вовсе, если специалисты что-то переносят или улучшают. Если на сайте идут технические работы, то скорее всего, вы увидите объявление в социальных сетях или на главной странице сайта.
Если объявлений нет, то позвоните на телефон горячей линии букмекерской конторы и узнайте у сотрудников что случилось.
Еще сайт может не открываться, если что-то сломалось или сервер, где располагается вся информация, находится под DDOS-атакой.
Проблемы у хостера
Сайты располагаются на специальных серверах, которые, как правило, предоставляют сторонние сервисы – хостеры. Поэтому сайт может не работать, если у хостера случилась какая-то неполадка:
- оборвался интернет-кабель или отключился интернет из-за технических работ на линии;
- выключился свет полностью или частично;
- произошла поломка оборудования;
- сервера подвержены сильной DDOS-атаке;
- на серверах проводятся технические работы.
Обычно хостер предупреждает своих клиентов о возможных перебоях, а те, в свою очередь, сообщают об этом пользователям сайта. Но бывают форс-мажоры из-за которых первыми о поломке узнают беттеры, когда не могут зайти на страницу букмекерской конторы.
Ответы на популярные вопросы
Почему меня могли заблокировать в букмекерской конторе Pin-Up.ru?
Варианта два: вы или нарушали правила, или были заблокированы по ошибке. Свяжитесь с технической поддержкой, чтобы выяснить ответ на этот вопрос.
Почему в одном браузере сайт открывается нормально, а в другом нет?
Попробуйте почистить кэш и куки в браузере. Если это не помогает, то проверьте, возможно вы давно не обновляли его и есть новая версия. На текущий момент, букмекерская контора корректно работает на всех популярных браузерах.
Могу ли я использовать прокси или VPN, чтобы делать ставки в Pin-Up.ru?
Использование программ, скрывающих ваш реальный IP адрес, может стать поводом блокировки аккаунта. Добавьте сайт Pin-Up.ru в исключения, если не хотите отключать VPN вовсе.
Нужно ли использовать рабочее зеркало Pin-Up.ru?
В этом нет необходимости, потому что легальная букмекерская контора Pin-Up.ru работает на территории РФ. Если вам приходится искать зеркало для доступа на сайт букмекера, вероятнее всего, вы пытаетесь играть в нелицензированной БК.
Pin Up Casino Пин Ап Официальный Сайт Онлайн Казино Pin [. ]
Content Как сделать в Мостбет бездепозитный бонус? Скачать MostBet 5.9.3 APK Скачать официальное приложение “Мостбет” на компьютер Дизайн и интерфейс приложения Скачать Mostbet UZ на
В оценке товаров мы используем исключительно отзывы экспертов, которые основаны на лабораторных исследованиях. Мы не собираем отзывы пользователей, так как ими легко манипулировать. Однако вы можете оставить отзыв о нашем исследовании.
TRABAJE CON NOSOTROS NOTICIAS BIENES ADJUDICADOS
Букмекерская контора «Пин-ап Бет» предлагает внушительный бонус всем новым игрокам. После регистрации и внесения суммы на счет компания начислит вам бонус в размере до 125% от первого депозита.
Чтобы найти зеркало, можно воспользоваться одним из нескольких вариантов:
Также игрок можете делать прямом в режиме Live.Более продвинутые юзеры, могут объединить несколько пари в одну, тем самым сделав экспресс. Это поможет увеличить выигрыш, если, конечно, все ставки сыграют.
MetaMask generates passwords and keys on your device, so only you have access to your accounts and data. You always choose what to share and what to keep private.
Сайт содержит информацию для лиц старше 18 лет. Размещенные на нем сведения не являются рекламой, носят исключительно информационный характер и предназначены только для личного использования. Для доступа вы должны подтвердить свое совершеннолетие.
Утилита позволяет составлять прогнозы на разные виды спорта в live формате или прематче. Для удобной навигации предстоящие игры рассортированы по категориям. Среди них: футбол, баскетбол, теннис, волейбол, хоккей и другие.